Wednesday, June 18, 2014

What is save point restore and how to configure it and use it in Oracle ADF?

Save point restore is a mechanism to save a particular state of the current ADF application transaction state and return to it after a certain amount of time (not more than 24hrs)

We can use the save point restore facility in the ADF taskflows to return to that particular state. If we use this, the application will store the following information temporarily to the database and retrieves it when we require.

The information stored at the save point is
  1. Current ADF model transaction state of the application
  2. Memory states of the ADF Controller specific scopes - Page flow scope and View scope
  3. ADF controller navigation state, all the taskflow calls to come to this state
  4. UI state of the current page like the tabs opened, rows of the table selected, choices selected in the Boolean checkbox 
By default, the saved information is active in the database for 24 hours and is deactivated after that.

Steps to configure and use the save point restore

Step1: Indicate the database connection that will be used to save the state in the adf-config.xml file which can be found in application resources -> Descriptors -> ADF META-INF -> adf-config.xml

Select the data source of the database where the framework can store the application state as below


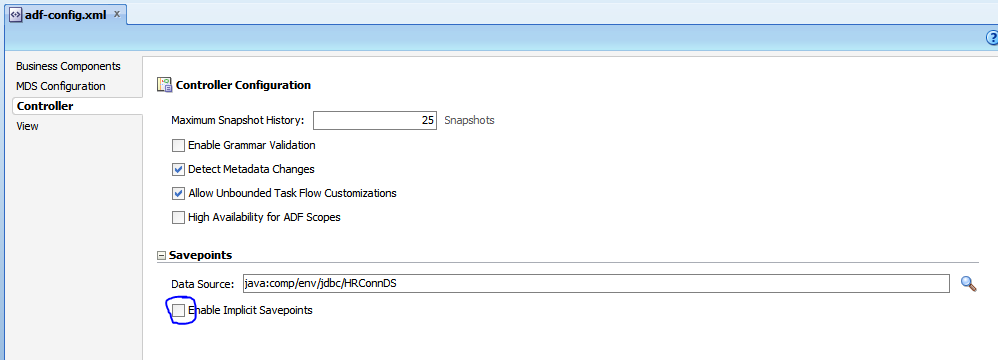
Clicking the check box enable implicit savepoints will save the application state automatically when the taskflow is marked as critical

Step2:

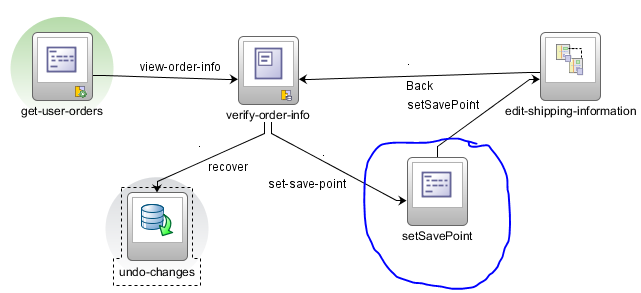
Decide the step in the taskflow where you want to save the state and invoke the controller method just before that to save the state as below.


The properties of the method to be executed are as below


The managed bean property configured in the return value of the method is a string and looks as below


Step3

Drag and drop the save point restore activity on to the current taskflow as shown in the tasflow. The properties of the activity are as below


Step4

Configure the command button/command link on clicking which the last change will be undone. Point the action property of the button to invoke the save point Restore activity

Tuesday, June 17, 2014

Change the webcenter portal default preferences based on a condition?

By default when the Oracle webcenter portal application is created, it comes up with the default navigation modal, default navigation registry, default skin etc...


If we would like to change then for example based on the security context of the user logged in, we can do so. All the default preferences are stored in adf-config.xml as below

<portal:preferences>
  <portal:preference id="oracle.webcenter.portalapp.navigation.model"
                     desc="Default Navigation Model"
                     value="/oracle/webcenter/portalapp/navigations/default-navigation-model.xml"
                     resourceType="navigation" display="true"/>
  <portal:preference id="oracle.webcenter.portalapp.resourcecatalog"
                     desc="Default Resource Catalog"
                     value="/oracle/webcenter/portalapp/catalogs/default-catalog.xml"
                     resourceType="ResourceCatalog" display="true"/>
  <portal:preference id="oracle.webcenter.portalapp.pagetemplate.pageTemplate"
                     desc="SPR Page Template"
                     value="/oracle/webcenter/portalapp/pagetemplates/MyAppTemplate.jspx"
                     resourceType="Template" display="true"/>
  <portal:preference id="oracle.webcenter.portalapp.navigation.renderer"
                     desc="Default Navigation Renderer"
                     value="/oracle/webcenter/portalapp/pages/navigation-renderer.jspx"
                     display="false"/>
  <portal:preference id="oracle.webcenter.portalapp.skin"
                     desc="Default Portal Skin" value="portal"
                     resourceType="Skin" display="true"/>
  <portal:preference id="oracle.webcenter.portalapp.sitemap"
                     desc="Default Sitemap EL"
                     value="#{navigationContext.defaultNavigationModel.defaultSiteMap}"
                     resourceType="Sitemap" display="true"/>
  <portal:preference id="oracle.webcenter.portalapp.baseresourceurl"
                     desc="Default Base Resource URL EL"
                     value="#{request.scheme}://#{request.serverName}:#{request.serverPort}#{request.contextPath}"
                     resourceType="BaseResourceURL" display="true"/>
</portal:preferences>


We can change/configure them based on an EL expression as shown below

<portal:preference id="oracle.webcenter.portalapp.navigation.model"
    desc="Default Navigation Model" resourceType="navigation" display="true"
    value="#{securityContext.authenticated ? /oracle/webcenter/portalapp/navigations/default-navigation-model.xml : /oracle/webcenter/portalapp/navigations/custom-navigation-model.xml"/>


Preserve runtime customizations of webcenter portal application?

Scenario:

Let is say we have developed a webcenter application using JDeveloper and made some runtime customizations from the webcenter portal administration console. Running the application again from the Jdeveloper removes all the customizations made.


Background

All the runtime customizations made are stored in a component called MDS but not in the physical folder location of JDeveloper application. And by default on running the portal application, all the runtime customizations are deleted.

Solution

To avoid this we have to override this default behavior from the portal application properties settings by clicking the preserve customizations across application runs as shown below.


Monday, June 16, 2014

How to customize the administration console URL in wecenter portal

By default, we can access the webcenter portal administration console from the following URL
http://www.app-server:port/applicaiton-context_root/admin.

We can customize it by making the following changes to the web.xml

  <servlet>
    <servlet-name>PortalAdminServlet</servlet-name>
    <servlet-class>oracle.webcenter.portalwebapp.servlet.PortalAdminServlet</servlet-class>
  </servlet>

  <servlet-mapping>
    <servlet-name>PortalAdminServlet</servlet-name>
    <url-pattern>/desired-url</url-pattern>
  </servlet-mapping>

Thursday, June 12, 2014

Introudction to JDeveloper 12c and effective ways to use it?

Apply a template at runtime in Oracle webcenter portal

We might need to change the application template at runtime from the Oracle Webcenter portal administration console. This can be done as shown below

Step1: 
  1. Make sure that template is available and not hidden
  2. If not available, select a particular template and click the edit button and select "Show"  


Step2:

Choose and apply the template from the configuration tab as shown below


Friday, June 6, 2014

Get the ResourceBundle handle based on the current Locale in ADF

import java.util.ResourceBundle;
import javax.faces.context.FacesContext;
import javax.faces.component.UIViewRoot;
import java.util.Locale;

private static ResourceBundle getBundle() {
    FacesContext ctx = getFacesContext();
    UIViewRoot uiRoot = ctx.getViewRoot();
    Locale locale = uiRoot.getLocale();
    ClassLoader ldr = Thread.currentThread().getContextClassLoader();
    return ResourceBundle.getBundle(ctx.getApplication().getMessageBundle(), locale, ldr);
}

Find if a ShowDetailItem is collapsed or expanded in managed bean?

Sometimes wither in the Panel Tabbed Layout or Panel Accordion, we would like to find if the show detail item is collapsed or expanded. This can be done as below

import oracle.adf.view.rich.component.rich.layout.RichShowDetailItem;

public void onClickSDITwo(DisclosureEvent disclosureEvent) {
    RichShowDetailItem item = (RichShowDetailItem)disclosureEvent.getSource();

    if (disclosureEvent.isExpanded() == true) {
        // If the show detail item is expanded then show all its children
        item.setDisclosed(true);
    }
    else if (disclosureEvent.isExpanded() == false) {
        // If the show detail item is collapsed then hide all its children
        item.setDisclosed(false);
    }
}

How to avoid java.io.NotSerializableException in Oracle ADF?

There are a few reasons for this error to appear in the logs.
  1. The managed bean class is not implementing Serializable and the bean is in scope greater than viewScope.
  2. The other reason could be that you have UI Component bindings in the serialized bean with scope greater than viewScope.
To avoid these error messages, you need to keep following things in mind while developing managed beans.
  1. Do not bind UI Components in managed beans with scope more than viewScope.
  2. If you have to use UI Component bindings then use backing bean to bind the UI Components and reference the pageFlowScope bean inside backing bean to process the important data.
Also by default the JDeveloper will not display these messages on the integrated server. To enable these message on the integrated server, run the server with following JVM parameter


-Dorg.apache.myfaces.trinidad.CHECK_STATE_SERIALIZATION=all

Monday, June 2, 2014

Create Oracle ADF business components based on Microsft SQL server

Inorder to do that, we need to connect to the Microsft SQL Server as described below

Platform - Win 7 x86 Enterprise
MS SQL Server 2008 Database Engine
JDeveloper 11.1.1.3

Oracle JDeveloper 11g uses JDBC 4.0 to connect with RDBMS since JDK1.6 supports JDBC4.0 & 
JDeveloper uses JDK 1.6 to compile all its classes. ojdbc6.jar classes to support basic 
functionality for the Thin and OCI drivers when using JDK 1.6 (JSE6) with Oracle database. 
Additional jar files are required when you use some features. See Oracle JDBC FAQ .

Well, that was of Oracle Database. MS SQL Server provides SQLJDBC4.jar class library, 
which provides support for JDBC 4.0. If you dont have this jar files, you won't be able to 
connect to MSSql server database. You can download from Microsoft.

1. Download sqljdbc4.jar from microsoft & save in filesystem.

2. Open JDeveloper & register the library file from Tool > Manage Libraries.

3. Click 'New' button by keep selecting 'User' Node.

4. In the 'Create Library' dialog click 'Add Entry' & locate your sqljdbc4.jar file & click 'Select' .

5. Optionally, you can check 'Deployed by default'.


managelibrary

6. Click OK.

7. Now, you are ready to establish connection to MSSQL Server.

8. Make sure your sqlserver engine is running & the account you are going to use for connect, is not
    locked.

9. From Database Navigator, create a new connection.

10.Next Screenshots are self explanatory except for 'Library' field where click 'Browse' & locate the jar file
     from 'Select Library' dialog.


selectLibrary

ConnectionDialog


11. Click Test Connection to test the connection.
Reference: http://adfblogspot.blogspot.com/2012/06/connecting-ms-sql-server-database-from.html